2022年:英語がプログラミング言語になった年
要約:数行の文章を打ち込むだけで付箋アプリを作りました。最初のプロンプトと最後の完成したコードだけでも見てみてください。
前回は、メモ帳と、部分的に動くtodo.txtアプリを作りました
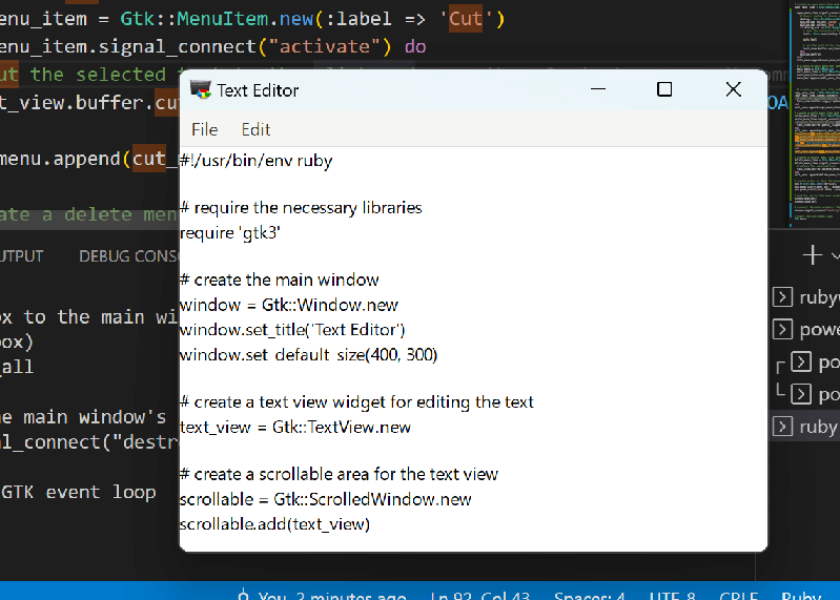
今回は付箋アプリを作ります。
※ 以下はChatGPTとの実際のやり取りです。英語で入力したプロンプト(「You」の部分)とエラーメッセージは、英語がそのまま「プログラミング言語」として使われた例なので原文のまま残し、ChatGPTの回答の地の文を日本語に訳しています。コードは元のままです。
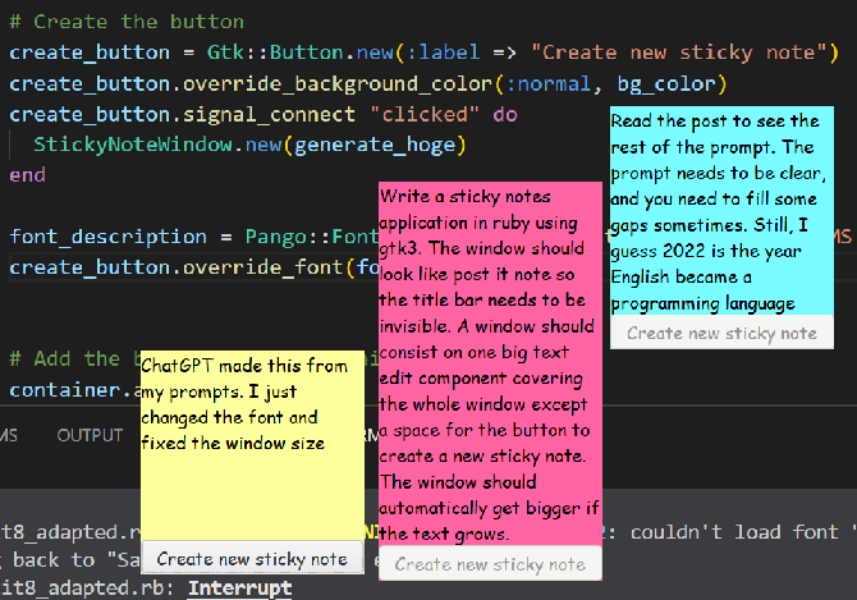
### You
Write a sticky notes application in ruby using gtk3. The window should look like post it note so the title bar needs to be invisible. A window should consist on one big text edit component covering the whole window except a space for the button to create a new sticky note. The window should automatically get bigger if the text grows. When a window is created, make a three digit random number called hoge. Automatically when the text edit component is changed write the contents of the sticky note into a file in the current directory with a filename that starts with note and contains the current date, and content of the hoge variable and ends with txt. When a new post it is created, choose one of (#ff7eb9,#ff65a3,#7afcff,#feff9c,#fff740) and set it as background color. On the bottom of the sticky note, make a transparent button, to create a new sticky note. When I click and drag the text edit component it should move the window. the code should be DRY. Just give me the code.
ChatGPT
以下は、GTK3を使ったRubyの付箋アプリケーションの例です。
require 'gtk3'
require 'date'

# Set the background colors for the sticky notes
NOTE_COLORS = ["#ff7eb9", "#ff65a3", "#7afcff", "#feff9c", "#fff740"]

# Generate a random three-digit number
def generate_hoge
  rand(100..999)
end

# Save the contents of the sticky note to a file
def save_note(hoge, contents)
  # Get the current date
  date = DateTime.now.strftime("%Y%m%d")

  # Create the file name
  file_name = "note-#{date}-#{hoge}.txt"

  # Open the file and write the contents
  File.open(file_name, "w") do |file|
    file.write(contents)
  end
end

class StickyNoteWindow < Gtk::Window
  def initialize(hoge)
    # Set the title bar to be invisible
    super(:toplevel)
    set_decorated(false)

    # Set the background color for the sticky note
    self.override_background_color(:normal, Gdk::RGBA.parse(NOTE_COLORS.sample))

    # Create the text edit component
    @text_view = Gtk::TextView.new
    @text_view.set_wrap_mode(:word)

    # Add the text edit component to the window
    add(@text_view)

    # Set up the signal to save the contents of the text edit component
    # when it is changed
    @text_view.signal_connect "changed" do
      save_note(hoge, @text_view.buffer.text)
    end

    # Set up the signal to move the window when the text edit component
    # is clicked and dragged
    @text_view.signal_connect "button-press-event" do |widget, event|
      if event.button == 1
        self.begin_move_drag(event.button, event.x_root, event.y_root, event.time)
      end
    end

    # Set up the signal to create a new sticky note when the button is clicked
    create_button = Gtk::Button.new(:label => "Create new sticky note")
    create_button.signal_connect "clicked" do
      StickyNoteWindow.new(generate_hoge)
    end
    add(create_button)
  end
end

# Create the initial sticky note window
StickyNoteWindow.new(generate_hoge)

# Start the GTK main loop
Gtk.main
このコードは、タイトルバーが非表示のGTKウィンドウを作成します。ウィンドウ全体をテキスト編集コンポーネントが占め、下部に新しい付箋を作るボタン用のスペースがあります。テキスト編集コンポーネントが変更されると、付箋の内容がカレントディレクトリのファイルに保存されます。ファイル名には現在の日付と3桁の乱数(hogeと呼びます)が含まれます。ウィンドウの背景色は、あらかじめ定義した色のリストから選ばれます。テキスト編集コンポーネントをクリックしてドラッグすると、ウィンドウを移動できます。ウィンドウ下部の
You
Continue
ChatGPT
ボタンをクリックすると、新しい3桁の乱数を使って新しい付箋ウィンドウが作成されます。
お役に立てば幸いです。ご質問があれば、お知らせください。
You
Find errors in the code
ChatGPT
先ほどのコードには、いくつか誤りがあります。
- set_decoratedメソッドには真偽値を渡す必要がありますが、コードではシンボル:toplevelが渡されています。set_decorated(false)に変更する必要があります。
- override_background_colorメソッドは、状態と色の2つの引数を取ります。コードでは色の引数しか渡されていません。self.override_background_color(:normal, Gdk::RGBA.parse(NOTE_COLORS.sample))に変更する必要があります。
- 「changed」シグナルのsignal_connectメソッドにブロックがありません。ブロックを正しく定義するには、@text_view.signal_connect “changed” doに変更する必要があります。
- addメソッドがcreate_buttonウィジェットに対して呼ばれていますが、このメソッドはGtk::Windowが継承しているGtk::Containerクラスにしか定義されていません。create_buttonウィジェットは、ウィンドウに追加する前にGtk::Boxなどのコンテナに追加する必要があります。
修正したコードは次のとおりです。
    ...
    set_decorated(false)

    # Set the background color for the sticky note
    self.override_background_color(:normal, Gdk::RGBA.parse(NOTE_COLORS.sample))

    # Create the text edit component
    @text_view = Gtk::TextView.new
    @text_view.set_wrap_mode(:word)

    # Add the text edit component to the window
    add(@text_view)

    # Set up the signal to save the contents of the text edit component
    # when it is changed
    @text_view.signal_connect "changed" do
      save_note(hoge, @text_view.buffer.text)
    end
    ...

    # Create a container to hold the button
    button_container = Gtk::Box.new(:vertical)

    # Set up the signal to create a new sticky note when the button is clicked
    create_button = Gtk::Button.new(:label => "Create new sticky note")
    create_button.signal_connect "clicked" do
    StickyNoteWindow.new(generate_hoge)
    end
    button_container.add(create_button)

    # Add the container to the window
    add(button_container)

    end
    end

    # Create the initial sticky note window

    StickyNoteWindow.new(generate_hoge)

    # Start the GTK main loop

    Gtk.main
お役に立てば幸いです。ご質問があれば、お知らせください。
You
Hmm, there is no changed event
ChatGPT
おっしゃるとおり、GTKには「changed」イベントはありません。代わりに、Gtk::TextViewウィジェットの「buffer-changed」シグナルを使えば、テキスト編集コンポーネントの変更を検出できます。
修正したコードは次のとおりです。
…
You
I think you mean key-release-event
Just give me the corrected code.
Also I’m getting the following error.
“Gtk-WARNING **: 18:59:23.397: Attempting to add a widget with type GtkBox to a GtkWindow, but as a GtkBin subclass a GtkWindow can only contain one widget at a time; it already contains a widget of type GtkTextView”
ChatGPT
おっしゃるとおり、テキスト編集コンポーネントの変更を検出するには「key-release-event」シグナルを使うべきです。修正したコードは次のとおりです。
require 'gtk3'
require 'date'

# Set the background colors for the sticky notes
NOTE_COLORS = ["#ff7eb9", "#ff65a3", "#7afcff", "#feff9c", "#fff740"]

# Generate a random three-digit number
def generate_hoge
  rand(100..999)
end

# Save the contents of the sticky note to a file
def save_note(hoge, contents)
  # Get the current date
  date = DateTime.now.strftime("%Y%m%d")

  # Create the file name
  file_name = "note-#{date}-#{hoge}.txt"

  # Open the file and write the contents
  File.open(file_name, "w") do |file|
    file.write(contents)
  end
end

class StickyNoteWindow < Gtk::Window
  def initialize(hoge)
    # Set the title bar to be invisible
    super()
    set_decorated(false)

    # Set the background color for the sticky note
    self.override_background_color(:normal, Gdk::RGBA.parse(NOTE_COLORS.sample))

    # Create the text edit component
    @text_view = Gtk::TextView.new
    @text_view.set_wrap_mode(:word)

    # Add the text edit component to the window
    add(@text_view)

    # Set up the signal to save the contents of the text edit component
    # when a key is released
    @text_view.signal_connect "key-release-event" do
      save_note(hoge, @text_view.buffer.text)
    end

    # Set up the signal to move the window when the text edit component
    # is clicked and dragged
    @text_view.signal_connect "button-press-event" do |widget, event|
      if event.button == 1
        self.begin_move_drag(event.button, event.x_root, event.y_root, event.time)
      end
    end

    # Create a container to hold the button
    button_container = Gtk::Box.new(:vertical)

    # Set up the signal to create a new sticky note when the button is clicked
    create_button = Gtk::Button.new(:label => "Create new sticky note")
    create_button.signal_connect "clicked" do
      StickyNoteWindow.new(generate_hoge)
    end
    button_container.add(create_button)

    # Add the container to the window
    add(button_container)
  end
end

# Create the initial sticky note window
StickyNoteWindow.new(generate_hoge)

# Start the GTK main loop
Gtk.main
受け取っているエラーについては、ウィンドウに複数のウィジェットを追加しようとしていることが原因のようです。Gtk::Windowには一度に1つのウィジェットしか入れられないので、複数のウィジェットを入れるには`Gtk
You
continue
ChatGPT
::Box`のようなコンテナを使う必要があります。
このエラーを解決するには、コードを次のように変更します。
require 'gtk3'
require 'date'

# Set the background colors for the sticky notes
NOTE_COLORS = ["#ff7eb9", "#ff65a3", "#7afcff", "#feff9c", "#fff740"]

# Generate a random three-digit number
def generate_hoge
  rand(100..999)
end

# Save the contents of the sticky note to a file
def save_note(hoge, contents)
  # Get the current date
  date = DateTime.now.strftime("%Y%m%d")

  # Create the file name
  file_name = "note-#{date}-#{hoge}.txt"

  # Open the file and write the contents
  File.open(file_name, "w") do |file|
    file.write(contents)
  end
end

class StickyNoteWindow < Gtk::Window
  def initialize(hoge)
    # Set the title bar to be invisible
    super()
    set_decorated(false)

    # Set the background color for the sticky note
    self.override_background_color(:normal, Gdk::RGBA.parse(NOTE_COLORS.sample))

    # Create a container to hold the text edit component and the button
    container = Gtk::Box.new(:vertical)

    # Create the text edit component
    @text_view = Gtk::TextView.new
    @text_view.set_wrap_mode(:word)

    # Add the text edit component to the container
    container.add(@text_view)

    # Set up the signal to save the contents of the text edit component
    # when a key is released
    @text_view.signal_connect "key-release-event" do
    save_note(hoge, @text_view.buffer.text)
    end

    # Set up the signal to move the window when the text edit component
    # is clicked and dragged
    @text_view.signal_connect "button-press-event" do |widget, event|
    if event.button == 1
        self.begin_move_drag(event.button, event.x_root, event.y_root, event.time)
    end
    end

    # Create the button
    create_button = Gtk::Button.new(:label => "Create new sticky note")
    create_button.signal_connect "clicked" do
    StickyNoteWindow.new(generate_hoge)
    end

    # Add the button to the container
    container.add(create_button)

    # Add the container to the window
    add(container)
    end
    end

    # Create the initial sticky note window

    StickyNoteWindow.new(generate_hoge)

    # Start the GTK main loop

    Gtk.main
お役に立てば幸いです。ご質問があれば、お知らせください。
You
No Window opens
ChatGPT
コードに、ウィンドウが表示されるのを妨げている問題があるようです。
考えられる問題の1つは、superの呼び出しより前にset_decoratedメソッドが呼ばれていることです。Gtk::WindowクラスはGtk::Binのサブクラスで、Gtk::Binクラスでは、ほかのメソッドを呼ぶ前に親クラスのinitializeメソッドを呼ぶ必要があります。
これを直すには、set_decoratedの呼び出しをsuperの呼び出しの後ろに移します。修正したコードは次のとおりです。
…
You
I think
win.signal_connect(“destroy”) { Gtk.main_quit }
win.show_all
are missing
ChatGPT
おっしゃるとおり、コードにはsignal_connectメソッドとshow_allメソッドが抜けています。
signal_connectメソッドは「destroy」シグナルのハンドラーを設定するのに使います。このシグナルはウィンドウが閉じられたときに発生します。シグナルが発生するとGtk.main_quitメソッドが呼ばれ、GTKのメインループが終了してプログラムが終わります。
show_allメソッドは、ウィンドウ内のすべてのウィジェットを表示するのに使います。
修正したコードは次のとおりです。
 ...
    signal_connect("destroy") { Gtk.main_quit }

    # Show all the widgets in the window
    show_all
end
end

# Create the initial sticky note window

StickyNoteWindow.new(generate_hoge)

# Start the GTK main loop

Gtk.main
お役に立てば幸いです。ほかにご質問があれば、お知らせください。
You
Ok great. However, I cannot see the background color. Make the text edit component transparent. Also please make the window 5 lines high when it is created.
ChatGPT
テキスト編集コンポーネントを透明にするには、opacityプロパティを0に設定します。これでコンポーネントは完全に透明になります。
また、テキスト編集コンポーネントのheightプロパティを設定すれば、何行分の高さにするかを指定できます。
変更したコードは次のとおりです。
    ...
    # Create the text edit component
    @text_view = Gtk::TextView.new
    @text_view.set_wrap_mode(:word)
    @text_view.set_opacity(0)
    @text_view.set_height(5)
    ...
お役に立てば幸いです。ほかにご質問があれば、お知らせください。
You
Nono, instead of opaque text edit. Set the background color of the text edit and the background color of the button to the same as the window background color. Also make sure that the window is at least 400 pixel tall and grows with the text edit. Remove the set_height of the text edit.
ChatGPT
テキスト編集コンポーネントとボタンの背景色をウィンドウと同じ色にするには、override_background_colorメソッドを使います。このメソッドは、ウィジェットの状態(この場合は:normal)と、色を表すGdk::RGBAオブジェクトの2つの引数を取ります。
ウィンドウの高さを最低400ピクセルにして、テキスト編集コンポーネントに合わせて大きくなるようにするには、コンテナのset_size_requestメソッドでコンテナの最小の高さを指定します。また、テキスト編集コンポーネントのset_vexpandプロパティを使えば、コンテナ内の空きスペースいっぱいに広げられます。
変更したコードは次のとおりです。
require 'gtk3'
require 'date'

# Set the background colors for the sticky notes
NOTE_COLORS = ["#ff7eb9", "#ff65a3", "#7afcff", "#feff9c", "#fff740"]

# Generate a random three-digit number
def generate_hoge
  rand(100..999)
end

# Save the contents of the sticky note to a file
def save_note(hoge, contents)
  # Get the current date
  date = DateTime.now.strftime("%Y%m%d")

  # Create the file name
  file_name = "note-#{date}-#{hoge}.txt"

  # Open the file and write the contents
  File.open(file_name, "w") do |file|
    file.write(contents)
  end
end

class StickyNoteWindow < Gtk::Window
  def initialize(hoge)
    # Set the title bar to be invisible
    super()
    set_decorated(false)

    # Set the background color for the sticky note
    bg_color = Gdk::RGBA.parse(NOTE_COLORS.sample)
    self.override_background_color(:normal, bg_color)

    # Create a container to hold the text edit component and the button
    container = Gtk::Box.new(:vertical)
    container.set_size_request(400, -1)

    # Create the text edit component
    @text_view = Gtk::TextView.new
    @text_view.set_wrap_mode(:word)
    @text_view.override_background_color(:normal, bg_color)
    @text_view.set_vexpand(true)

    # Add the text edit component to the container
    container.add(@text_view)

    # Set up the signal to save the contents of the text edit component
    # when a key is released
    @text_view.signal_connect "key-release-event" do
      save_note(hoge, @text_view.buffer.text)
end

# Set up the signal to move the window when the text edit component
# is clicked and dragged
@text_view.signal_connect "button-press-event" do |widget, event|
  if event.button == 1
    self.begin_move_drag(event.button, event.x_root, event.y_root, event.time)
  end
end

# Create the button
create_button = Gtk::Button.new(:label => "Create new sticky note")
create_button.override_background_color(:normal, bg_color)
create_button.signal_connect "clicked" do
  StickyNoteWindow.new(generate_hoge)
end

# Add the button to the container
container.add(create_button)

# Add the container to the window
add(container)

# Set up the signal to exit the GTK main loop when the window is closed
signal_connect("destroy") { Gtk.main_quit }

# Show all the widgets in the window
show_all

end
end

# Create the initial sticky note window

StickyNoteWindow.new(generate_hoge)

#Start the GTK main loop

Gtk.main
お役に立てば幸いです。ほかにご質問があれば、お知らせください。
You
ありがとう、ChatGPT。いったいどうしてこれでうまくいったのでしょうか。
You
How do I make the font much bigger?
ChatGPT
テキスト編集コンポーネントのフォントを大きくするには、override_fontメソッドを使います。このメソッドは、使用するフォントを表すPango::FontDescriptionオブジェクトを引数に取ります。
Pango::FontDescriptionオブジェクトはPango::FontDescription.newメソッドで作成でき、フォントサイズはsize=メソッドで設定します。サイズはポイント単位で指定し、72ポイントが1インチに相当します。
テキスト編集コンポーネントのフォントを大きくする例です。
font_description = Pango::FontDescription.new
font_description.size = 36
@text_view.override_font(font_description)
sizeプロパティに別の値を設定すれば、フォントサイズを好みに合わせて調整できます。
お役に立てば幸いです。ほかにご質問があれば、お知らせください。
You
I can’t see any font now
ChatGPT
フォントサイズを設定した後でテキスト編集コンポーネントの文字が見えない場合は、文字色が背景色と同じ色になっている可能性があります。
文字色を設定するには、テキストビューのoverride_colorメソッドを使います。このメソッドは、ウィジェットの状態(この場合は:normal)と、色を表すGdk::RGBAオブジェクトの2つの引数を取ります。
文字色を黒にする例です。
text_color = Gdk::RGBA.parse("#000000")
@text_view.override_color(:normal, text_color)
Gdk::RGBAオブジェクトに別の色を設定すれば、文字色を好みに合わせて調整できます。
お役に立てば幸いです。ほかにご質問があれば、お知らせください。
You
I still cannot see the font
ChatGPT
文字色を設定した後もテキスト編集コンポーネントの文字が見えない場合は、フォントサイズがウィジェットに対して大きすぎる可能性があります。
この問題を切り分けるには、フォントサイズを小さくして文字が見えるようになるか試してみてください。小さくすると見えるようになるなら、希望のサイズで表示できるように、ウィジェットのサイズを大きくする必要があるかもしれません。
ウィジェットのサイズはset_size_requestメソッドで設定できます。このメソッドは、ウィジェットの幅と高さをピクセル単位で指定する2つの引数を取ります。
たとえば、ウィジェットのサイズを800x600ピクセルにするには、次のコードを使います。
@text_view.set_size_request(800, 600)
お役に立てば幸いです。ほかにご質問があれば、お知らせください。
You
I think it’s the font description. How do I set the default font?
ChatGPT
テキスト編集コンポーネントにデフォルトのフォントを設定するには、override_fontメソッドに、サイズやスタイルを指定していないPango::FontDescriptionオブジェクトを渡します。
デフォルトのフォントを表すPango::FontDescriptionオブジェクトは、Pango::FontDescription.newメソッドを引数なしで呼べば作成できます。
テキスト編集コンポーネントにデフォルトのフォントを設定する例です。
font_description = Pango::FontDescription.new
@text_view.override_font(font_description)
あるいは、Pango::FontDescription.from_stringメソッドを使って、フォントを表す文字列からPango::FontDescriptionオブジェクトを作成することもできます。
たとえば、フォントを「Sans 12」にするには、次のコードを使います。
font_description = Pango::FontDescription.from_string("Sans 12")
@text_view.override_font(font_description)
お役に立てば幸いです。ほかにご質問があれば、お知らせください。
You
ありがとう、ChatGPT。これがうまくいったなんて、正直まだ信じられません。
コツは、自分が何を求めているのかをうまく言葉にすることです。ChatGPTは自分からいろいろなことを考え出してくれました。たとえば最初は背景色を正しく設定してくれませんでしたが、それは私の頼み方がまずかったからです。
この技術には本当に期待しています。Sam Altmanに求職のメール(ChatGPTが生成したもの)まで送ってしまいました。返事が来たら、これがどれだけすごいかわかるでしょう。
require 'gtk3'
require 'date'

# Set the background colors for the sticky notes
NOTE_COLORS = ["#ff7eb9", "#ff65a3", "#7afcff", "#feff9c", "#fff740"]

# Generate a random three-digit number
def generate_hoge
  rand(100..999)
end

# Save the contents of the sticky note to a file
def save_note(hoge, contents)
  # Get the current date
  date = DateTime.now.strftime("%Y%m%d")

  # Create the file name
  file_name = "note-#{date}-#{hoge}.txt"

  # Open the file and write the contents
  File.open(file_name, "w") do |file|
    file.write(contents)
  end
end

class StickyNoteWindow < Gtk::Window
  def initialize(hoge)
    # Set the title bar to be invisible
    super()
    set_decorated(false)

    # Set the background color for the sticky note
    bg_color = Gdk::RGBA.parse(NOTE_COLORS.sample)
    self.override_background_color(:normal, bg_color)

    # Create a container to hold the text edit component and the button
    container = Gtk::Box.new(:vertical)
    container.set_size_request(250, 250)

    # Create the text edit component
    @text_view = Gtk::TextView.new
    @text_view.set_wrap_mode(:word)
    @text_view.override_background_color(:normal, bg_color)
    @text_view.set_vexpand(true)

    # font_description = Pango::FontDescription.new
    # font_description.size = 8
    # @text_view.override_font(font_description)
    font_description = Pango::FontDescription.from_string("Comic Sans MS 12")
    @text_view.override_font(font_description)

    text_color = Gdk::RGBA.parse("#000000")
    @text_view.override_color(:normal, text_color)

    # Add the text edit component to the container
    container.add(@text_view)

    # Set up the signal to save the contents of the text edit component
    # when a key is released
    @text_view.signal_connect "key-release-event" do
      save_note(hoge, @text_view.buffer.text)
end

# Set up the signal to move the window when the text edit component
# is clicked and dragged
@text_view.signal_connect "button-press-event" do |widget, event|
  if event.button == 1
    self.begin_move_drag(event.button, event.x_root, event.y_root, event.time)
  end
end

# Create the button
create_button = Gtk::Button.new(:label => "Create new sticky note")
create_button.override_background_color(:normal, bg_color)
create_button.signal_connect "clicked" do
  StickyNoteWindow.new(generate_hoge)
end

font_description = Pango::FontDescription.from_string("Comic Sans MS 12")
create_button.override_font(font_description)


# Add the button to the container
container.add(create_button)

# Add the container to the window
add(container)

# Set up the signal to exit the GTK main loop when the window is closed
signal_connect("destroy") { Gtk.main_quit }

# Show all the widgets in the window
show_all

end
end

# Create the initial sticky note window
StickyNoteWindow.new(generate_hoge)

# Start the GTK main loop

Gtk.main